
Exporting Real Info Box Newsletter HTML to Mailchimp
- Real Info Box
- Jan 20
- 3 min read
Updated: Jan 21
Purpose
This guide shows you how to export your Real Info Box newsletter as HTML code and import it into your Mailchimp account for sending.
Prerequisites
✓ Logged into your Real Info Box account
✓ Logged into your Mailchimp account
✓ Draft newsletter ready in Real Info Box
VIDEO MANUAL
PART 1: Export HTML from Real Info Box
Step 1: Navigate to Campaigns
From your Real Info Box home screen, click on the Campaigns tab
Step 2: Select Your Campaign
Choose the campaign you want to export to Mailchimp
Click the Edit (pencil) icon on the right side

Step 3: Review Your Newsletter
Preview your newsletter content
If changes are needed, make edits now and click Save
(For editing help, see separate editing manual - coming soon)

Step 4: Open Preview
Click the Preview button
Review the newsletter one final time

Step 5: Copy HTML Code
In the preview window, click HTML
Click Copy HTML (green button)
✓ A green indicator confirms the code is copied
Keep this window open (you'll need it if you want to make changes later)

PART 2: Import HTML into Mailchimp
Step 6: Create New Campaign
In Mailchimp, click Campaigns (left sidebar)
Click Create

Select Email → Regular

Step 7: Set Up Email Details
Campaign Name: Enter your campaign name (e.g., "Real Estate Newsletter")
To: Select your recipient list
From: Verify sender information
Subject: Enter your email subject line
Click Save (note: you must complete these fields to proceed)

Step 8: Design Email - Choose Template Method
Important Account Information:
💡 Paid Account Option: If you have a Mailchimp paid account ($28/month or $63/month for 500+ contacts), you can use "Code your own" to paste HTML directly.
📘 Free Account Method: This guide uses the template method, which works with free Mailchimp accounts.
Click Design Email
Choose Use new builder
Select Basic layouts → Minimal
Click Apply

Step 9: Prepare Template
Delete unnecessary blocks:
Delete the large heading block
Delete the image placeholder
Delete the button
Delete social icons (unless you want to keep them)

Keep these blocks:
✓ "View this email in your browser" link (top)
✓ Footer block (required - contains company info and unsubscribe link)

Step 10: Add Code Block
From the Content Blocks panel on the left, find Code
Drag the Code block between the "View in browser" link and the footer
You can delete the divider line if desired

Step 11: Paste Your HTML
(Go back to Step 5: Copy HTML Code)
Click on the Code block you just added
The code editor will open on the left
Delete any placeholder text
Paste your copied HTML code (Ctrl+V or Cmd+V)
The newsletter will appear instantly in the preview

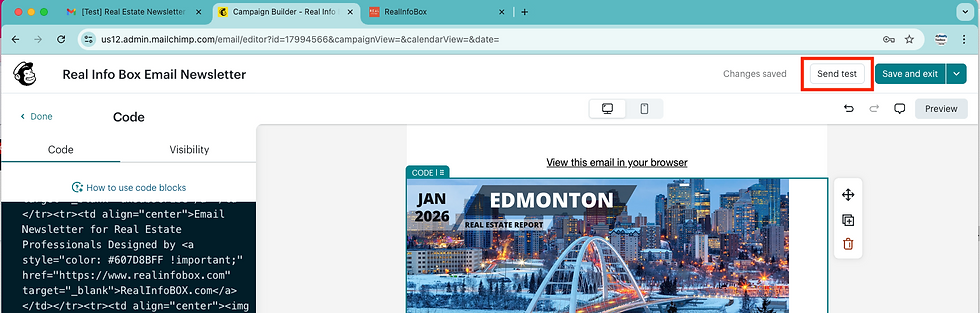
Step 12: Send Test Email (Recommended)
Click Send a Test Email
Enter your email address
Click Send test
Check your inbox to verify the newsletter displays correctly
Step 13: Final Review in Your Inbox
Open the test email
Verify:
All images load correctly
Layout looks good
Links work properly
Content matches your Real Info Box preview

Step 14: Make Changes (If Needed)
If you need to make edits, go back to your Real Info Box account
Make changes in the editor
Click Save → Preview → HTML → Copy HTML
Return to Mailchimp
Click Edit design
Paste the updated HTML code
Test again
Step 15: Save and Send
Once satisfied, click Save and Exit
You'll see your campaign summary
Options:
Send now - Send immediately
Schedule - Set a future send time
Finish later - Save as draft


Comments